-
The plastic cap does actually fit. Couple taps with a small rubber mallet.

Nope. Tried that. It wouldn't even start. When I tried tapping it with a plastic deadblow hammer (small version) the cap collapsed. POS part, but no worries. I'll find a suitable replacement.
-

-
I started the cap to the first rib with slow steady pressure then tapped it in with the mallet. Easy peasy Japaneesy.
I like the annodized aluminium. To each his own. :)
-
-
Thanks guys. Dalroo and I were really pleased with how they turned out.
Both bikes look great. I almost bought a blue Connie, but ended up with a black '11. I need to hook up with one of you two guys to see what those bars look like in person.
-
-
Sure dude! Gordon tx... So you ride FM4 a bunch i suppose?
-
-
Sure dude! Gordon tx... So you ride FM4 a bunch i suppose?
Yes, I ride it every so often. It's starting to get a little rough in spots, though. It's also the only place I've ever crashed . Did that just north of Santo on an FZ6 when I was first getting back into riding.
I work in Arlington, so I'm closer to your area a lot.
-
-
With the Gen 2 cages front/rear installed, are any of you feeling the need to also have slider protection for the front axle and rear swing arms? If so, can you recommend options?
These are nice IMO...
http://www.zggtr.org/index.php?topic=7642.msg98456#msg98456
-
-
Awesome! Glad to hear they arrived! Psh, just ride over there with the parcel tucked under your arm!

With enough straps, it seems anything is possible:
-
-
The Canyon Cages are now installed. Below are pictures. Here are my observations:
* The packaging used was excellent. Double boxed, reinforced tape, paper padding, thick plastic bags.
* No parts were missing. Instructions were pretty clear, although should be updated to supply recommended torques.
* The workmanship and finishes on the Canyons is the same as when I got the rears- excellent.
* The alignments and fit were absolutely perfect. (Except the little plastic hole-filler thing, which didn't fit)
* They appear to be very strong and will do what was advertised as far as protecting the bike.
* We had no trouble removing the long rear engine mount bolt using an impact wrench. The left side engine mount bolt was easy using hand tools. The RIGHT engine mount bolt was a total pain and required tons of effort using a 1/2" breaker bar and was almost as hard re-inserting. We think Kawasaki maybe used too much threadlock? Or maybe the hole was not properly tapped?
* As others have already pointed out, the nut that holds the angle brace on both sides is extremely difficult to get to. We did not have a speed/ratchet wrench of the correct size nor a socket wrench that would work. So it took 20 min per nut, having to re-position a regular wrench every 1/24th of a turn.
* I think they look fine. I would prefer a more dull silver than the bright chrome. The chrome rears I already installed match better. The fronts would probably have blended better in black; although there are enough other silver- bright and dull, on the bike to pull it together. If I had it to do over, I might go all black.
* The Canyons do not overly interfere with Ronnie's highway pegs. They make getting the pegs down harder than before, though. When using the pegs, the bars hit the tops of my boots. This isn't a problem for me (in fact, I kinda like it) but for someone with really big feet, it could pose an issue.
* I am not happy with the overall attachment design of the Canyons; the reason being that they are far more difficult and time consuming to install and remove than I had anticipated (even with better tools). I especially dislike the forward-pointing bolt that supports the bottom/front mount. When the Canyons are removed (like if you had to take it in for service), you can't ride the bike without first putting back all the original bolts. I think it would have been far better if there were permanent brackets inside the fairings and the bars mount to those much more easily; of course this would trade ease of use for some strength. I had pictured quickly removing three user-facing bolts per side, which is not the case.
-
-
Curious how long the install took for you, Max.
You don't need to remove them for service. You can cut 1 small non-structural piece pf plastic and leave them on.
-
-
Curious how long the install took for you, Max.
My friend is a master mechanic. I am a nobody and attempted to help some, but there was only one of any particular tool (we were at his house, not work). The whole process took about 1.5 hours. Most of it on that one engine bolt and the two insane nuts. Of course, it was also freaking super-hot, and the bike was super-hot, and we were not exactly full of energy.
If we had to repeat it, knowing now exactly what to do, but still without a ratchet wrench, it would take maybe under an hour. If we had a ratchet wrench, probably under 30 min.QuoteYou don't need to remove them for service. You can cut 1 small non-structural piece pf plastic and leave them on.
Are you positive about that? (You did it/tested that?) If so, that might be an option- could you elaborate (with pics if possible) exactly what cut you mean? Are you cutting the thinnest, forward attachment point of the second-to-top-most vent fin or something?
-
-
Quote
* I am not happy with the overall attachment design of the Canyons; the reason being that they are far more difficult and time consuming to install and remove than I had anticipated (even with better tools). I especially dislike the forward-pointing bolt that supports the bottom/front mount. When the Canyons are removed (like if you had to take it in for service), you can't ride the bike without first putting back all the original bolts. I think it would have been far better if there were permanent brackets inside the fairings and the bars mount to those much more easily; of course this would trade ease of use for some strength. I had pictured quickly removing three user-facing bolts per side, which is not the case.
I agree with Maxtog on this point. As much as this is a nice piece of equipment, I was expecting it to be better engineered for a truly quick release mechanism. This was a discussion topic on the original thread (the really long one). I don't know whether it will be possible to easily remove the Canyon cages by cutting one of the fins on the fairing; I suspect this is the case because this will allow freer access to the forward-facing interior mounting bolts. But the idea all along was to be able to quickly remove the cages without resorting to surgery on the fairing. As things are now, whenever one of the side cowlings needs to be removed, I will have spend about 30 minutes to remove those pesky interior mounting bolts (and another 30 minutes to re-install).
-
-
I'm 99% positive that cutting that one little attachment piece will free the fairing without removing the bars. Yes, Max, exactly the point you describe. Some other forum user has done this with the bathroom bars, successfully and tested. Should be exactly the same thing. I'll see if I can find the thread.
I recall the discussion about quick release during the development, but my recollection was that it was discarded due to cost, strength, and complexity issues.
The instructions say that the engine bolts are 10mm. They're 8mm. At least on Dalroo and my 2010 models, they were 8mm.
I can't imagine how little fun the install would have been without a gear wrench, I concur fully. But I didn't find ANYTHING difficult to get to, and I have pretty large hands. I wear an XL glove. The left side forward facing bracket nut was an interesting challenge until I approached it from the lowest opening. Then it was easy.
-
-
Here is the thread where a guy with an 08 cut the fin for his bathroom bars.
http://forum.cog-online.org/index.php/topic,30288.msg137261.html#msg137261
You can see that the plastic is not really structurally necessary. You would have to verify the correct slot before cutting.
-
-
Constructive criticism:
We're definitely going to update the installation instructions with torque value recommendations. I apologize that these weren't on the original batch of instructions but live and learn, I suppose. I'm glad you got the part installed with limited issues, though.
Instructions:
- Provide hardware torque value recommendations in the instructions -- none currently appear.
- no recommendation for thread lock on any of the front guard hardware, but there is a mention of it on the rear. I used a dab of blue thread lock on the front stuff anyway, except for the Teflon nuts.
- Plastic cap -- I am assuming that plastic cap is for the right side opening where the new long bolt went through? It doesn't fit. I destroyed mine trying to get that in. I will hit the hardware store and find a better alternative. Lowes has a lot of rubber plugs like that, plastic ones too.
Regarding the thread lock, that's normally on all of our installation instructions but apparently we overlooked it when writing up this set. I'll also be sure to add a note to the instructions to use blue thread locker when installing the new bolts.
That's weird that your plastic plug didn't fit. We've sold over 75 of these sets now and I've only heard from two people that they had an issue with that plastic plug, everyone elses fit with no issue. I'm wondering if it's because material just happened to collect at that spot during the powder coating process which resulted in your plug not fitting. There's no other reason I can come up with that 2 out of 75+ wouldn't work.2) Sorry, and not to offend with my bias, but the color matched powder coating was the right choice. When I can post photos, unless Necron beats me to it, you might agree, this was a great option.
The color matched bars definitely came out looking AWESOME! Also, we'll be adding the breaker bar, a socket extension, a rubber mallet, and a 5/8" gear wrench to the required tools section of the instructions.
6) Before starting, make sure you have a breakover bar, a lengthy extension, rubber mallet, and 5/8" gear wrench. Deep sockets were also handy.I look forward to the color matched pics. I debated this but the 09 Candy Red would be hard to match and it would contrast with the black lower cowl if it was coated red. Still not 100% sure at this point but leaning twd leaving them black.
I really like the look of the black bars on the Candy Red Connie. If you'd like an idea of what they'd look like, you can check out our thread for the earlier generation Connie Group Buy stickied at the top of the Accessories section. The bike we used for the build was red and the finalized bars are black powder coat.I started the cap to the first rib with slow steady pressure then tapped it in with the mallet. Easy peasy Japaneesy.
For some reason a couple people had an issue with that plastic cap not fitting. For the vast majority of others, it went in with no problems whatsoever. I'm wondering if it has something to do with slightly more material collecting at that point of the bar during the powder coating process. There's no other reason I could think of that most peoples' plastic caps would work and two peoples' wouldn't. Has to be some freak thing with the finish, I'm guessing.It's also the only place I've ever crashed
I don't mean to get off-topic but how'd you like that FZ6? I ride a 2011 FZ8 myself and absolutely love it! Although I have to say, frequenting this forum has got me wanting a damn Connie!. Did that just north of Santo on an FZ6 when I was first getting back into riding.* I think they look fine. I would prefer a more dull silver than the bright chrome. The chrome rears I already installed match better. The fronts would probably have blended better in black; although there are enough other silver- bright and dull, on the bike to pull it together. If I had it to do over, I might go all black.
Yea, the chrome is pretty bright. What do you mean the rears match better, though? Do you mean they match the rear section of the bike better because the fronts overlap that flat black plastic subfairing towards the front of the bike? The rears you have in chrome and the Canyon Cage are finished identically. They were done through the same plater with the same exact process and both bars should look exactly the same as one another.
* I am not happy with the overall attachment design of the Canyons; the reason being that they are far more difficult and time consuming to install and remove than I had anticipated (even with better tools). I especially dislike the forward-pointing bolt that supports the bottom/front mount. When the Canyons are removed (like if you had to take it in for service), you can't ride the bike without first putting back all the original bolts. I think it would have been far better if there were permanent brackets inside the fairings and the bars mount to those much more easily; of course this would trade ease of use for some strength. I had pictured quickly removing three user-facing bolts per side, which is not the case.
I'm sorry to hear you're not totally satisfied with the overall attachment though. However, you did say yourself that with the correct tools (and knowledge from previously putting on and taking off the bars) it would take less than 30 minutes to put them on or take them off which really doesn't seem too bad. If we were to use a design like you're recommending where there are brackets just inside the fairing that allow you to remove the exterior of the Canyon Cage while leaving the mounting brackets, you'd still have to work through some tight spaces which seems to be the most time consuming part of the install and would surely add cost as well. The only way to truly get a "quick-release" style would be to use a cotter pin and swage design which would severely reduce the strength. We came to the conclusion that the trade off of a 30 minute install was worth the assurance that the bar wouldn't crumble when the bike was dropped. Don't get me wrong, I'm not trying to argue with you or change your opinion. I'm just trying to explain our position and why we made some of the structural decisions we ended up making.Are you positive about that? (You did it/tested that?) If so, that might be an option- could you elaborate (with pics if possible) exactly what cut you mean? Are you cutting the thinnest, forward attachment point of the second-to-top-most vent fin or something?
Don't quote me on this but I believe the cut he's talking about is the one pictured below: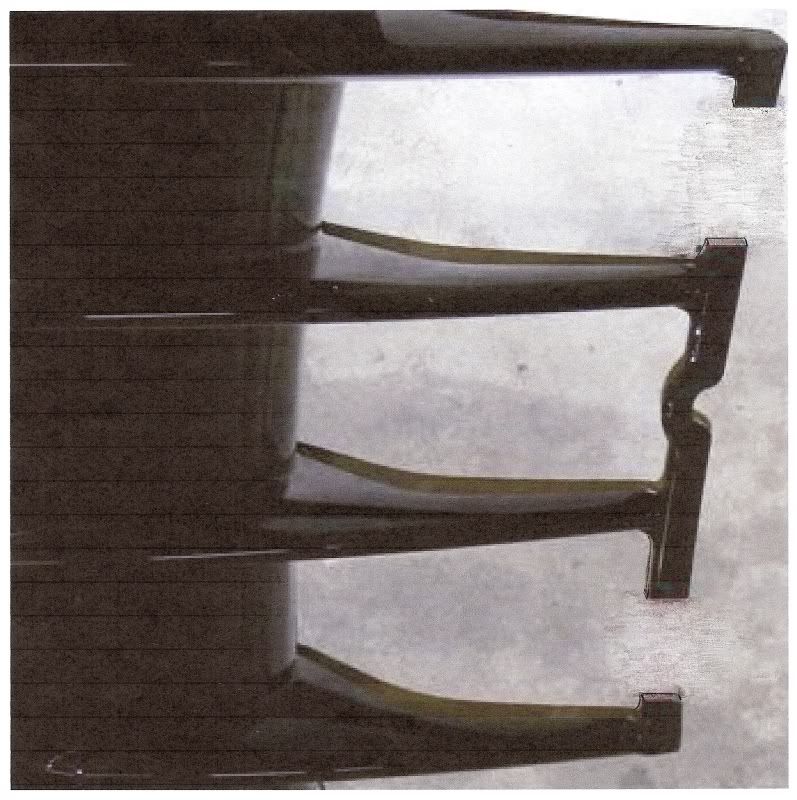
I know people have done this modification to make the fairings easier to remove with our law enforcement guards but I don't think anyone has verified this with our Canyon Cages. I assume it would work the same way but I can't be positive.The instructions say that the engine bolts are 10mm. They're 8mm. At least on Dalroo and my 2010 models, they were 8mm.
There are both 10mm and 8mm motor mounts on the Connie. The Canyon Cage, however, only uses the 10mm points to mount.
-
-
...
There are both 10mm and 8mm motor mounts on the Connie. The Canyon Cage, however, only uses the 10mm points to mount. ...
10mm bolt uses a 8mm (5/16) drive... I think that's where the confusion with Necron's comment comes in.
-
-
That'd be it.

-
-
Necron99 and Ryan - thanks for the photos on the cuts to the fairing. Any advice on how to cut the fairing without cracking it? Also, anyone know if the fairing stability is effected by these cuts? Specifically, I am wondering if they might rattle a bit with the end piece of the fins being transformed from one solid piece to three disconnected pieces. Thanks in advance for any advice.
-
-
No clue, I haven't cut it. Ask the guy in the other thread, I'm sure he'll be happy to provide feedback.
If I do cut it, I'll use a dremel.
-
-
Necron99 and Ryan - thanks for the photos on the cuts to the fairing. Any advice on how to cut the fairing without cracking it? Also, anyone know if the fairing stability is effected by these cuts? Specifically, I am wondering if they might rattle a bit with the end piece of the fins being transformed from one solid piece to three disconnected pieces. Thanks in advance for any advice.
I believe some customers have made that modification with a dremel after taping parts of the fairing off so the paint wouldn't chip. You can also do it with a fine-tooth hacksaw, again, after taping the fairing to reduce the paint chipping. I'd probably recommend the hacksaw, myself. Just seems a bit safer and less likely to chip the paint or crack the plastic. I don't believe this would affect the fairing stability as the fairing is still one solid piece towards the left side of the photo I posted. There are small pieces of foam glued to those forwardmost sections where the front part of that fairing piece slides behind the main portion of the fairing which would help hold it tight and reduce vibration. You may have to cut and move the foam if you make this modification though so each little section has a piece of foam on it to help reduce vibration. Someone who has actually made this modification first-hand would probably be able to provide a bit better feedback.
-
That's weird that your plastic plug didn't fit. We've sold over 75 of these sets now and I've only heard from two people that they had an issue with that plastic plug, everyone elses fit with no issue. I'm wondering if it's because material just happened to collect at that spot during the powder coating process which resulted in your plug not fitting. There's no other reason I can come up with that 2 out of 75+ wouldn't work. For some reason a couple people had an issue with that plastic cap not fitting. For the vast majority of others, it went in with no problems whatsoever. I'm wondering if it has something to do with slightly more material collecting at that point of the bar during the powder coating process. There's no other reason I could think of that most peoples' plastic caps would work and two peoples' wouldn't. Has to be some freak thing with the finish, I'm guessing.
I am thinking differences in the cheapo plastic cap, Ryan, as there was no build up at all on the inside of the recess. I pulled a rubber cap from a frame fastener on my DR650 that fit perfectly, so I think those plastic caps are just junk. That's all.